Board contents
Text extracted from this public whiteboard for search and accessibility.
Build a Flask website on Raspberry Pi
Session 02 · Build a Flask website on the Pi
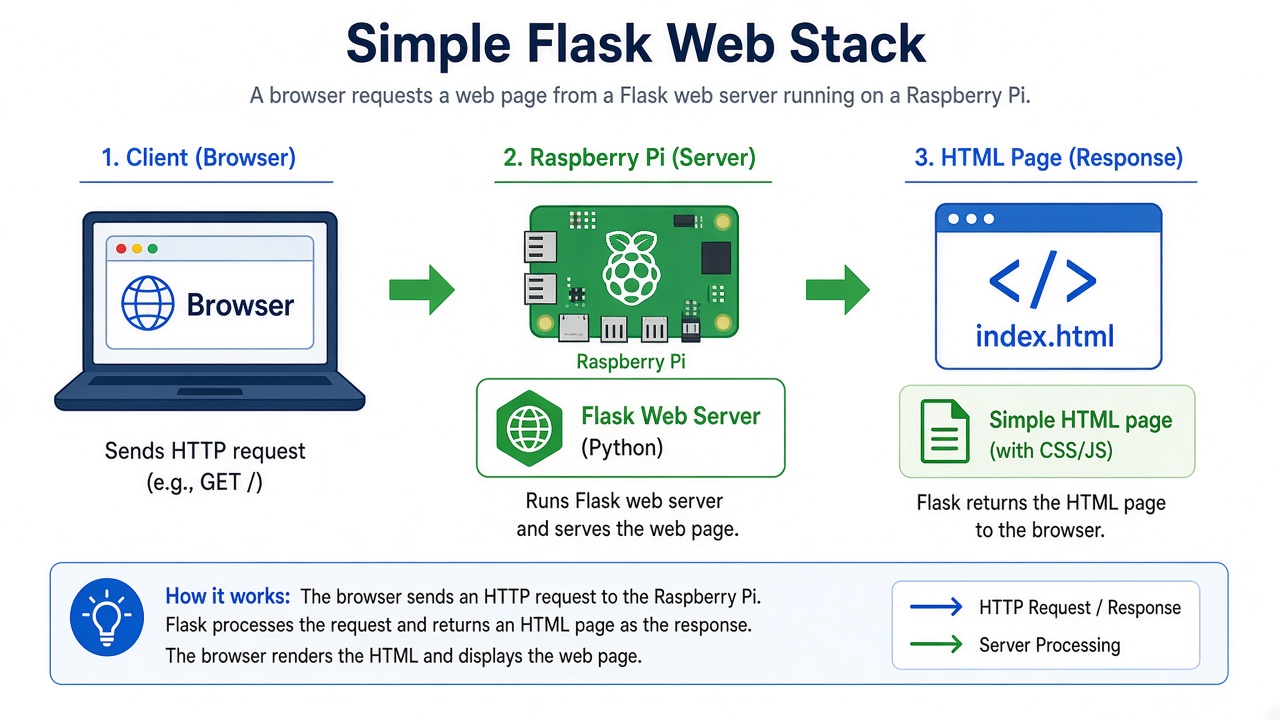
Follow every command: virtualenv, app.py, HTML templates, a visit counter, and open the site from your laptop browser. Fully generic — your hostname, your content.
What you will build
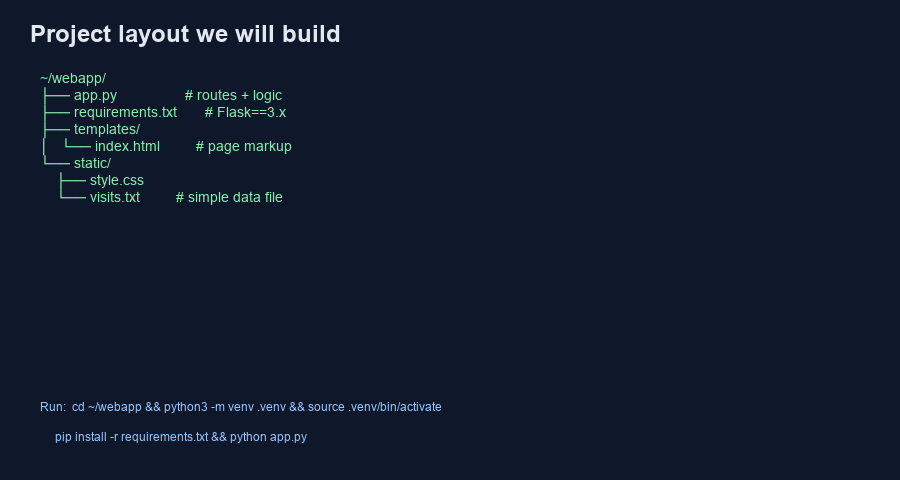
A small web app that: • Serves a home page at http://mypi.local:5000/ • Serves a second page at /about • Renders HTML from templates/ • Counts visits in static/visits.txt • Shows the count at /stats Prereq: Session 01 done (you can SSH into the Pi).
Step 1 — Prepare Python on the Pi (via SSH)
ssh piuser@mypi.local sudo apt update sudo apt install -y python3-pip python3-venv mkdir -p ~/projects/webapp/{templates,static} cd ~/projects/webapp python3 -m venv .venv source .venv/bin/activate python -m pip install --upgrade pip pip install 'Flask>=3.0,<4' echo 'Flask>=3.0,<4' > requirements.txt echo '0' > static/visits.txt
Step 2 — Create app.py (on the Pi or edit locally & SFTP)
nano ~/projects/webapp/app.py # --- paste this file --- from pathlib import Path from flask import Flask, render_template app = Flask(__name__) VISITS = Path(__file__).parent / 'static' / 'visits.txt' def bump_visits() -> int: n = int(VISITS.read_text().strip() or '0') + 1 VISITS.write_text(str(n)) return n @app.route('/') def home(): count = bump_visits() milestone = (count % 100 == 0) return render_template('index.html', count=count, milestone=milestone) @app.route('/about') def about(): return '<h1>About</h1><p>Flask on a Raspberry Pi.</p>' @app.route('/stats') def stats(): n = int(VISITS.read_text().strip() or '0') return f'Total visits: {n}' if __name__ == '__main__': # 0.0.0.0 = reachable from your laptop on the LAN app.run(host='0.0.0.0', port=5000, debug=True)
Step 3 — Create templates/index.html
nano ~/projects/webapp/templates/index.html <!doctype html> <html lang="en"> <head> <meta charset="utf-8" /> <title>My Pi Website</title> <link rel="stylesheet" href="{{ url_for('static', filename='style.css') }}" /> </head> <body> <main> <h1>Hello from my Raspberry Pi</h1> <p>Thank you for visiting!</p> <p>You are visitor #{{ count }}.</p> {% if milestone %} <p class="congrats">Congratulations! You are the {{ count }}th visitor.</p> {% endif %} <p><a href="/about">About</a> · <a href="/stats">Stats</a></p> </main> </body> </html>
Step 4 — Create static/style.css
nano ~/projects/webapp/static/style.css body { font-family: system-ui, sans-serif; background: #0f172a; color: #e2e8f0; } main { max-width: 40rem; margin: 4rem auto; padding: 2rem; } a { color: #38bdf8; } .congrats { color: #fbbf24; font-weight: 700; }
Step 5 — Run the server
cd ~/projects/webapp source .venv/bin/activate python app.py Leave this terminal open. You should see: Running on http://0.0.0.0:5000
Step 6 — Open from your laptop
Browser: http://mypi.local:5000/ http://mypi.local:5000/about http://mypi.local:5000/stats Refresh / a few times — the counter should rise. Every 100th visit shows the congratulation line.
How the pieces fit
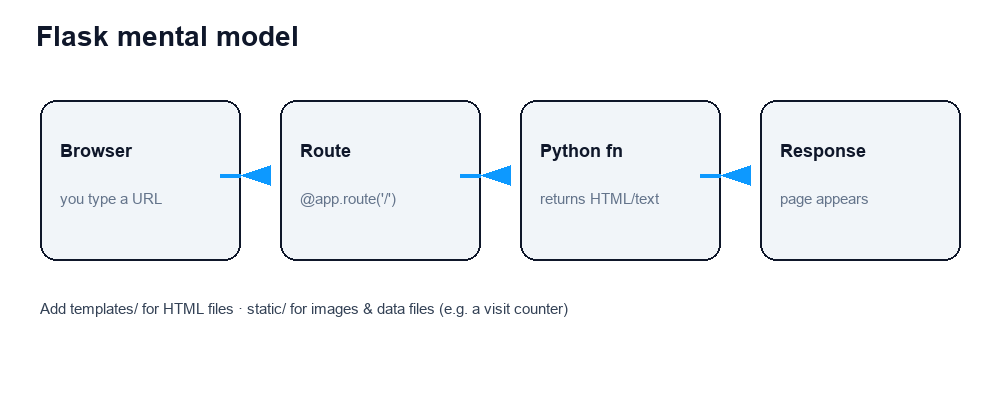
@app.route('/path') binds a URL path to a Python function. return 'text' sends plain text. return render_template(...) sends HTML. {{ count }} in the template is filled from render_template(..., count=count). {% if milestone %} ... {% endif %} is template logic. static/ files are public assets (CSS, images, simple data files). host='0.0.0.0' is required so devices other than the Pi can connect.
Edit from your laptop (optional)
Use SFTP/SCP so you can use a real editor: scp app.py piuser@mypi.local:~/projects/webapp/ Or open an SFTP client: host: mypi.local user: piuser protocol: SFTP / port 22 After edits, stop the server with Ctrl+C and run python app.py again (debug=True often auto-reloads on save).
Run in the background (optional)
For a quick detach with tmux: sudo apt install -y tmux tmux new -s web cd ~/projects/webapp && source .venv/bin/activate && python app.py # Ctrl+B then D to detach tmux attach -t web # later Production tip (later sessions): put the app behind Docker + a reverse proxy instead of debug Flask.
Checklist — Session 02 complete when…
☐ venv works and Flask is installed ☐ http://mypi.local:5000/ shows your HTML page ☐ /about and /stats work ☐ visits.txt increments on each home-page load ☐ You can explain route → function → template in one sentence Next forks: • Session 03 — read a sensor and show it on the page • Session 05 — containerize this app with Docker